
EzCad2UNI User’s Manual
press key F9.
Note: EzCad2 takes the first part of left top corner as “part one”, in turns “part two” , “part
three” place from left to right. Putting the figure in the center can locate coordinates more
accurately when you set part.
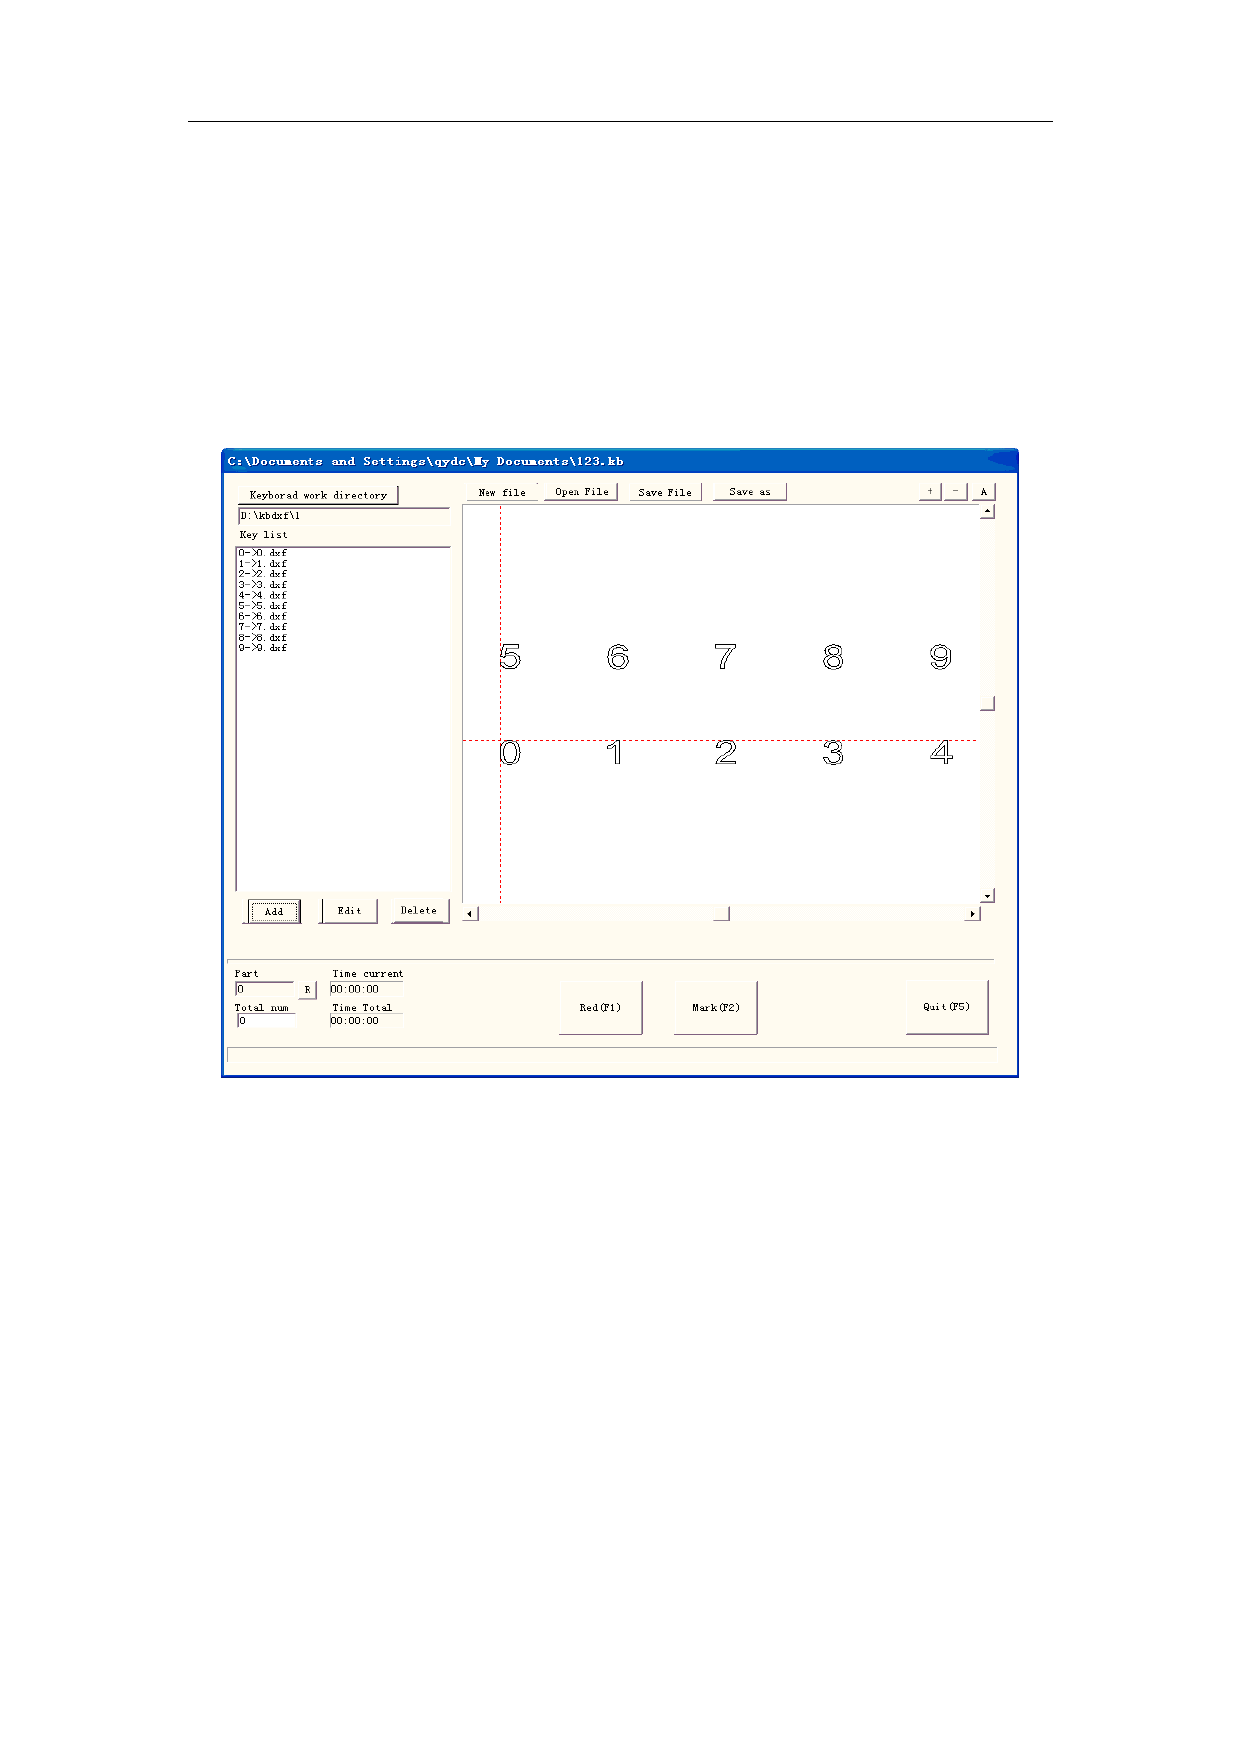
8.5 Power Keyboard
The Power Keyboard module is the special module for the keyboard marking.
The dialog box is the following figure 8-20
Figure 8-20
Specific operation:
1.Suppose the user needs to processes one kind of keyboard,on the keyboard has 10 key -presses,
respectively is 0,1,2,3,4,5,6,7,8,9, the user must make a .dxf graphic file for each pressed key:
The key-press 0 corresponding graphic files are 0.dxf
The key-press 1 corresponding graphic files are 1.dxf
The key-press 2 corresponding graphic files are 2.dxf
The key-press 3 corresponding graphic files are 3.dxf
The key-press 4 corresponding graphic files are 4.dxf
The key-press 5 corresponding graphic files are 5.dxf
The key-press 6 corresponding graphic files are 6.dxf
The key-press 7 corresponding graphic files are 7.dxf
The key-press 8 corresponding graphic files are 8.dxf
The key-press 9 corresponding graphic files are 9.dxf
108
reserved
All rights
 LabelMark EZCAD V2 Software Manual")
 LabelMark EZCAD V2 Software Manual")
 LabelMark EZCAD V2 Software Manual")
 LabelMark EZCAD V2 Software Manual")
 LabelMark EZCAD V2 Software Manual")
 LabelMark EZCAD V2 Software Manual")
 LabelMark EZCAD V2 Software Manual")
 LabelMark EZCAD V2 Software Manual")
 LabelMark EZCAD V2 Software Manual")
 LabelMark EZCAD V2 Software Manual")
 LabelMark EZCAD V2 Software Manual")
 LabelMark EZCAD V2 Software Manual")
 LabelMark EZCAD V2 Software Manual")
 LabelMark EZCAD V2 Software Manual")
 LabelMark EZCAD V2 Software Manual")
 LabelMark EZCAD V2 Software Manual")
 LabelMark EZCAD V2 Software Manual")
 LabelMark EZCAD V2 Software Manual")
 LabelMark EZCAD V2 Software Manual")
 LabelMark EZCAD V2 Software Manual")
 LabelMark EZCAD V2 Software Manual")
 LabelMark EZCAD V2 Software Manual")
 LabelMark EZCAD V2 Software Manual")
 LabelMark EZCAD V2 Software Manual")
 LabelMark EZCAD V2 Software Manual")
 LabelMark EZCAD V2 Software Manual")
 LabelMark EZCAD V2 Software Manual")
 LabelMark EZCAD V2 Software Manual")
 LabelMark EZCAD V2 Software Manual")
 LabelMark EZCAD V2 Software Manual")
 LabelMark EZCAD V2 Software Manual")
 LabelMark EZCAD V2 Software Manual")
 LabelMark EZCAD V2 Software Manual")
 LabelMark EZCAD V2 Software Manual")
 LabelMark EZCAD V2 Software Manual")
 LabelMark EZCAD V2 Software Manual")
 LabelMark EZCAD V2 Software Manual")
 LabelMark EZCAD V2 Software Manual")
 LabelMark EZCAD V2 Software Manual")
 LabelMark EZCAD V2 Software Manual")
 LabelMark EZCAD V2 Software Manual")
 LabelMark EZCAD V2 Software Manual")
 LabelMark EZCAD V2 Software Manual")
 LabelMark EZCAD V2 Software Manual")
 LabelMark EZCAD V2 Software Manual")
 LabelMark EZCAD V2 Software Manual")
 LabelMark EZCAD V2 Software Manual")
 LabelMark EZCAD V2 Software Manual")
 LabelMark EZCAD V2 Software Manual")
 LabelMark EZCAD V2 Software Manual")
 LabelMark EZCAD V2 Software Manual")
 LabelMark EZCAD V2 Software Manual")
 LabelMark EZCAD V2 Software Manual")
 LabelMark EZCAD V2 Software Manual")
 LabelMark EZCAD V2 Software Manual")
 LabelMark EZCAD V2 Software Manual")
 LabelMark EZCAD V2 Software Manual")
 LabelMark EZCAD V2 Software Manual")
 LabelMark EZCAD V2 Software Manual")
 LabelMark EZCAD V2 Software Manual")
 LabelMark EZCAD V2 Software Manual")
 LabelMark EZCAD V2 Software Manual")
 LabelMark EZCAD V2 Software Manual")
 LabelMark EZCAD V2 Software Manual")
 LabelMark EZCAD V2 Software Manual")
 LabelMark EZCAD V2 Software Manual")
 LabelMark EZCAD V2 Software Manual")
 LabelMark EZCAD V2 Software Manual")
 LabelMark EZCAD V2 Software Manual")
 LabelMark EZCAD V2 Software Manual")
 LabelMark EZCAD V2 Software Manual")
 LabelMark EZCAD V2 Software Manual")
 LabelMark EZCAD V2 Software Manual")
 LabelMark EZCAD V2 Software Manual")
 LabelMark EZCAD V2 Software Manual")
 LabelMark EZCAD V2 Software Manual")
 LabelMark EZCAD V2 Software Manual")
 LabelMark EZCAD V2 Software Manual")
 LabelMark EZCAD V2 Software Manual")
 LabelMark EZCAD V2 Software Manual")
 LabelMark EZCAD V2 Software Manual")
 LabelMark EZCAD V2 Software Manual")
 LabelMark EZCAD V2 Software Manual")
 LabelMark EZCAD V2 Software Manual")
 LabelMark EZCAD V2 Software Manual")
 LabelMark EZCAD V2 Software Manual")
 LabelMark EZCAD V2 Software Manual")
 LabelMark EZCAD V2 Software Manual")
 LabelMark EZCAD V2 Software Manual")
 LabelMark EZCAD V2 Software Manual")
 LabelMark EZCAD V2 Software Manual")
 LabelMark EZCAD V2 Software Manual")
 LabelMark EZCAD V2 Software Manual")
 LabelMark EZCAD V2 Software Manual")
 LabelMark EZCAD V2 Software Manual")
 LabelMark EZCAD V2 Software Manual")
 LabelMark EZCAD V2 Software Manual")
 LabelMark EZCAD V2 Software Manual")
 LabelMark EZCAD V2 Software Manual")