Roland CAMMJET PRO 1 GX 24, GX 300, GX 400,
GX 500
Cutting a Laminated Job
The CAMMJET GX series cutters default to the left side of the
device. Each device has a specific width limitation. Consult
your device manual for more information.
To print a job on another device and use a CAMMJET GX as a
cutter:
1. When printing the job:
a. Select the appropriate CAMMJET GX as the cutter.
b. Set Registration mark to Roland CAMMJET GX
series number.
If you are using PhotoPRINT, the software automatically adds the
appropriate registration marks to the job when you select the output
device in the Workflow tab of Job Properties.
c. Set Send to Print job only.
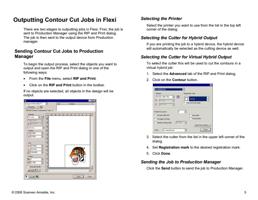
2. Print the job. The print out should look similar to the image
below, with black circles and crop marks added by the
printer.
3. Remove the media from the printer.
© 2006 Scanvec Amiable, Inc.
4. Use the sheet direction arrows to load the media in the
CAMMJET GX 300. The arrows should point toward the
cutter when inserted from the front.
5. On the device’s front panel, set the rotation degree to zero
(0). See your device manual for instructions.
6. Use the arrow keys on the device’s front panel to move the
cutter’s sensor head over a registration mark.
7. Set Send Mode to Contour Only.
8. Click Send. The device will automatically detect the
alignment marks and cut the contour.
Roland VersaCAMM SP-300/SP-300V/SP-540V
Printing a Laminated Job
When you want to print a job, remove it from the printer (for
lamination or the like), then reload the media and cut the job,
the SP300 automatic alignment function makes it possible to
align the printing and cutting positions.
To cut a contour using the Roland AutoSense Crop Marks:
1. Be sure you have installed the USB driver that was
supplied on the “SP300 Driver Disk Printer Driver
Installation” CD.
2. Add a setup for the cutter to PhotoPRINT or Production
Manager.
a. Set Port to USB_Printer_0.
3. Depending on the application, do the following:
• In PhotoPRINT, add the job and open Job Properties.
• In Flexi, design the job and open the RIP and Print
dialog.
4. Position the job at least 4 inches from the bottom of the
media, and at least 4 inches from the right edge.
5. Set Registration Mark to Roland VersaCAMM.
6. Set Send to Print job only.
23


