Feature Tree

Features are capabilities of the cameras and camera modules that can be controlled by setting firmware parameters. The feature tree displays all available features of a connected camera and you can edit the parameters under each feature.

Note:

The available features of the camera vary with different camera models.

You can perform the following four generic operations.

Table 1 Generic Operations on Feature Tree

Generic Operation

Description

Show or Hide Features

Click to show or hide the camera features under all feature categories.

Switch User Level

Switch user level (Beginner, Expert, or Guru) at the bottom of the Feature Tree tab.

Note:

The higher the user level, the more camera features will be displayed. Guru Level provides the most comprehensive camera features for professional use.

Add Feature/Parameter to Favorites

Right-click a frequently-used feature category or a specific feature/parameter, and then click Add to Favorites to add it to the Favorites.

By default, the features/parameters added to Favorites are ranked by time. You can drag the added feature/parameter to adjust its rank.

View Description of Feature/Parameter

Click the name of a feature or parameter to view its description at the bottom of the tab page.

Switch Language

Click to switch the language of this pane to Chinese.

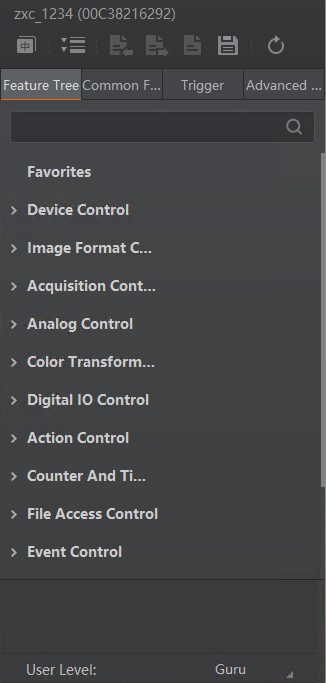
Figure 1 The Feature Tree Tab

The following table briefly introduces the description of each feature category.

Table 2 Feature Category Description

Feature Category

Description

Device Control

Contains the features related to the control and information of the camera.

You can do the followings:

  • View the camera details including device type, version, manufacturer details, device ID, device temperature, etc.

  • Modify the alias and reset the camera.

Image Format Control

Contains the features related to the format of the transmitted image.

You can do the followings:

  • View the live view image width and height, pixel size, etc.

  • Set ROI, modify pixel format, set image reverse, test pattern, and set the embedded information, etc.

Acquisition Control

Contains the features related to image acquisition, including trigger and exposure control.

You can set the trigger mode, trigger source, acquisition mode, etc.

Analog Control

Contains the features related to the video signal conditioning in the analog domain.

You can adjust the analog signal including analog gain, black level, brightness, gamma, sharpness, AOI, etc.

LUT Control

Contains the features related to the look-up table (LUT) control.

You can view the user look-up table and set the LUT index and value.

Digital I/O Control

Contains the features related to the control of the input and output pins of the camera.

You can manage the digital input and output.

Action Control

Contains the features related to the control of action command.

You can use the features to define the mechanism of the action command.

Counter and Timer Control

Contains the features related to the usage of programmable counters and timers.

You can set the counter and timer, which count the triggering signal and control the exposure according to your needs.

File Access Control

Contains the features related to accessing files in the camera.

You can use File Access to export and import camera settings.

Event Control

Contains the features related to the generation of event notifications by the camera.

You can use Event Monitor to view the messaging channel events to determine causes of issues that may occur during the use of your camera.

Chunk Data Control

Contains the features related to the generation of supplementary image data (i.e., Chunk data) and the appending of that data to every image that you acquire.

You can enable chunk data, and set the content of the chunk data.

Transport Layer Control

Contains the features related to the control of transport layer.

You can set the parameters of transport layer of the camera.

User Set Control

Contains the features related to the global control of camera settings.

User Set Current

The currently loaded user set.

  • "0" represents Default, i.e., the factory settings.

  • "1" represents UserSet1.

  • "2" represents UserSet2.

  • "3" represents UserSet3.

User Set Selector

Select User Set.

Note:

The number of User Sets vary with different camera models.

Default

The read-only factory settings. In other words, the default startup settings on the camera.

User Set1, User Set2, User Set3

The user sets that can be used to load and save your own camera settings.

Initially, these user sets contain the same parameter values as the Default user set. You can save one of them to overwrite those values with your own settings to create a user set that is customized for your usage scenario. See the description of User Set Save below for details about saving User Set.

User Set Load

Load the User Set specified by User Set Selector to the camera and make the it active. When a user set is loaded, it overwrites the current camera settings.

Note:
  • Loading a user set is only possible when the camera is idle, i.e., not acquiring images.

  • Except for the Default user set, you should have saved a User Set before you can load it. See the description of User Set Save below for details about saving User Set.

User Set Save

Save your own camera settings as the User Set specified by User Set Selector.

Note:
  • Only the UserSet1, UserSet2, and UserSet3 can be saved. The other user sets are read-only.

  • Saving a user set is only possible when the camera is idle, i.e., not acquiring images.

User Set Default

Select User Set to automatically load and make it active by default when the camera is reset to its power up state.