Home
3D
PrintUP 3D Printer
PioCreat 3D Printer
Printers
FastCOLOUR >>
ATools
DTF Textile
UV-DTF
FlatPRINT
PrintExp
InkRIP
Lasers
TruCUT CO
2
>>
TruCUT RDWorks
TruCUT 2020+
TruCUT Express
TruCUT Lite >>
4030 & Vertical Software
4030 & Vertical Documents
New 6040 Desktop
LabelMark
RayCUT
MorCUT >>
MorCUT-Cyclops
LaserMaster
Plasmas
MetalWise
Fabricam
Routers
EasyRoute
PowerRoute
Blade Cutters
Vinyl Cutters >>
V-Series
V-Smart
V-Auto (& V-Smart+)
Vinyl4
Flatbed Cutters >>
FlatCUT
Label Cutters >>
V-Auto Label Cutters
Software >>
VinylCut
More
FastCUT
Heatware
Rollman
ScreenMaster
Other Software
Miscellaneous
AM.CO.ZA
/
Buy CNC Software
/
CNC Software Training
/
CNC Software Downloads
Sales: 072 222 2211
Support: 076 666 6655
Training: 060 818 1818
Jo’burg: 087 802 5368
Cape Town: 087 802 7106
An
Project
Multimedia
Univision Videos
#SortIT Videos
MakersLab.TV
Software Training
Welldone Gallery
Updates
Prevision Blog
Cornerstone Trust
Email Campaigns
Contact Us
Sales WhatsApp
060 600 6000
Support WhatsApp
060 600 7000
Johannesburg Headquarters
011 397 1429
087 802 5368
Cape Town Showroom
021 555 3250
087 802 7106
Links
CNC Machine Repair
Vinyl Cutter
Heatware
You are here:
AM.CO.ZA
Buythis
CNC Utilities Homepage
FlatCUT-Flatbed-Cutting-Machine
iCUT Oscillating Blade CNC Router
iCut High Speed Cutting Machine User Manual.pdf
Page 2 of 47
X ingduowei Icut high speed cutting machine User Manual (Page 2 / 148) iCut High Speed Cutting Machine User Manual
Home
3D
PrintUP 3D Printer
PioCreat 3D Printer
Printers
FastCOLOUR >>
ATools
DTF Textile
UV-DTF
FlatPRINT
PrintExp
InkRIP
Lasers
TruCUT CO
2
>>
TruCUT RDWorks
TruCUT 2020+
TruCUT Express
TruCUT Lite >>
4030 & Vertical Software
4030 & Vertical Documents
New 6040 Desktop
LabelMark
RayCUT
MorCUT >>
MorCUT-Cyclops
LaserMaster
Plasmas
MetalWise
Fabricam
Routers
EasyRoute
PowerRoute
Blade Cutters
Vinyl Cutters >>
V-Series
V-Smart
V-Auto (& V-Smart+)
Vinyl4
Flatbed Cutters >>
FlatCUT
Label Cutters >>
V-Auto Label Cutters
Software >>
VinylCut
More
FastCUT
Heatware
Rollman
ScreenMaster
Other Software
Miscellaneous
AM.CO.ZA
/
Buy CNC Software
/
CNC Software Training
/
CNC Software Downloads
Sales: 072 222 2211
Support: 076 666 6655
Training: 060 818 1818
Jo’burg: 087 802 5368
Cape Town: 087 802 7106
An
Project
Multimedia
Univision Videos
#SortIT Videos
MakersLab.TV
Software Training
Welldone Gallery
Updates
Prevision Blog
Cornerstone Trust
Email Campaigns
Contact Us
Sales WhatsApp
060 600 6000
Support WhatsApp
060 600 7000
Johannesburg Headquarters
011 397 1429
087 802 5368
Cape Town Showroom
021 555 3250
087 802 7106
Links
CNC Machine Repair
Vinyl Cutter
Heatware
You are here:
AM.CO.ZA
Buythis
CNC Utilities Homepage
FlatCUT-Flatbed-Cutting-Machine
iCUT Oscillating Blade CNC Router
iCut High Speed Cutting Machine User Manual.pdf
Page 2 of 148
X ingduowei Icut high speed cutting machine User Manual (Page 2 / 148) iCut High Speed Cutting Machine User Manual
Home
3D
PrintUP 3D Printer
PioCreat 3D Printer
Printers
FastCOLOUR >>
ATools
DTF Textile
UV-DTF
FlatPRINT
PrintExp
InkRIP
Lasers
TruCUT CO
2
>>
TruCUT RDWorks
TruCUT 2020+
TruCUT Express
TruCUT Lite >>
4030 & Vertical Software
4030 & Vertical Documents
New 6040 Desktop
LabelMark
RayCUT
MorCUT >>
MorCUT-Cyclops
LaserMaster
Plasmas
MetalWise
Fabricam
Routers
EasyRoute
PowerRoute
Blade Cutters
Vinyl Cutters >>
V-Series
V-Smart
V-Auto (& V-Smart+)
Vinyl4
Flatbed Cutters >>
FlatCUT
Label Cutters >>
V-Auto Label Cutters
Software >>
VinylCut
More
FastCUT
Heatware
Rollman
ScreenMaster
Other Software
Miscellaneous
AM.CO.ZA
/
Buy CNC Software
/
CNC Software Training
/
CNC Software Downloads
Sales: 072 222 2211
Support: 076 666 6655
Training: 060 818 1818
Jo’burg: 087 802 5368
Cape Town: 087 802 7106
An
Project
Multimedia
Univision Videos
#SortIT Videos
MakersLab.TV
Software Training
Welldone Gallery
Updates
Prevision Blog
Cornerstone Trust
Email Campaigns
Contact Us
Sales WhatsApp
060 600 6000
Support WhatsApp
060 600 7000
Johannesburg Headquarters
011 397 1429
087 802 5368
Cape Town Showroom
021 555 3250
087 802 7106
Links
CNC Machine Repair
Vinyl Cutter
Heatware
You are here:
AM.CO.ZA
Buythis
CNC Utilities Homepage
FlatCUT-Flatbed-Cutting-Machine
iCUT Oscillating Blade CNC Router
iCut High Speed Cutting Machine User Manual.pdf
Page 2 of 148
X
ingduowei Icut
high speed cutting
machine
User
Manual
V
er
sion 5.0.5
1
welcome
W
elcome to use Xingduowei Icut flexible material cutting machine software.
[Improve
Mult
i-Dimensional
High-Speed
Cutting
Machine
Control
Software]
(abbreviated
as
Icut)
is
a
specialized
control
syst
em
designed
for
multi-industry
cutting
machines.
This
software
excels
in
processing
flexible
materials
such
as
textiles,
advertising
mat
erials,
and
carbon
fiber
,
whil
e
also
supporti
ng
milling
operations
on
rigid
materials
including
acrylic,
alum
inum
plates,
copper
sheets,
and
wood.
Its
core
functionalities
encompass
graphic
optimization,
parameter
configuration,
custom
izable
cutting
pattern
editing,
i
ntelligent
material
nesting,
path
planning
opti
mization,
machining
simul
ation,
and
real-time
process
control.
The
Icut
software
must
be
used
with
the
corresponding
hardware
equipment
to
achieve
processing
operation cont
rol.
The Icut software supports of
fline demonstration operations.
W
ithout onl
ine, it supports non-processing
control demonstration operations.
Y
ou can experience the software without the device.
This manual is written based on version 5.0. Due to the continuous addition and update of software
functions, there m
ay be some dif
ferences between the Icut software you are using and the description in
this m
anual.
W
e hereby apologize for this.
If you have any questions or problem
s in the process of use, please contact us in time.
2
!
The
operation
and
cutting
effect
of
the
machine
tool
ar
e
dir
ectly
r
elated
to
the
cutting
material,
machine
configuration,
the
tool
you
use
and
the
parameters
you
set.
Please
set
the
pr
ocess parameters car
efully according to your
cutti
ng pr
ocess r
equir
ements.
Impr
oper
parameter
Settings
or
incorr
ect
operations
may
lead
to
r
educed
cutti
ng
performance,
head
or
other
parts
of
the
machine
tool
and
even
personal
injury
.
The
Icut
contr
ol
system
has
made
every
effort
to
pr
ovide
various
pr
otective
measur
es,
and
equipment
manufactur
ers
and
end
customers
should
strictly
follow
the
operation
pr
ocedur
es
to
avoid
acci
dents.
catalogue
Xingduowei
Icut high speed cutting machine
_______________________________________________
1
welcome
_
_
_
_
_
_
_
_
_
_
_
_
_
_
_
_
_
_
_
_
_
_
_
_
_
_
_
_
_
_
_
_
_
_
_
_
_
_
_
_
_
_
_
_
_
_
_
_
_
_
_
_
_
_
_
_
_
_
_
_
_
_
_
_
_
_
_
_
_
_
_
_
_
_
_
_
_
_
2
1. Quick Start
_________________________________________________________________________
7
1.1 Featur
es
_
_
_
_
_
_
_
_
_
_
_
_
_
_
_
_
_
_
_
_
_
_
_
_
_
_
_
_
_
_
_
_
_
_
_
_
_
_
_
_
_
_
_
_
_
_
_
_
_
_
_
_
_
_
_
_
_
_
_
_
_
_
_
_
_
_
_
_
_
_
_
7
1.2 Obtain and instal
l software
_
_
_
_
_
_
_
_
_
_
_
_
_
_
_
_
_
_
_
_
_
_
_
_
_
_
_
_
_
_
_
_
_
_
_
_
_
_
_
_
_
_
_
_
_
_
_
_
_
_
_
_
_
_
_
8
1.3 Start using
_
_
_
_
_
_
_
_
_
_
_
_
_
_
_
_
_
_
_
_
_
_
_
_
_
_
_
_
_
_
_
_
_
_
_
_
_
_
_
_
_
_
_
_
_
_
_
_
_
_
_
_
_
_
_
_
_
_
_
_
_
_
_
_
_
_
_
_
_
8
1.3.1 Desktop shortcut icon opening mode
_
_
_
_
_
_
_
_
_
_
_
_
_
_
_
_
_
_
_
_
_
_
_
_
_
_
_
_
_
_
_
_
_
_
_
_
_
_
_
_
_
_
8
1.3.2 User interface
_
_
_
_
_
_
_
_
_
_
_
_
_
_
_
_
_
_
_
_
_
_
_
_
_
_
_
_
_
_
_
_
_
_
_
_
_
_
_
_
_
_
_
_
_
_
_
_
_
_
_
_
_
_
_
_
_
_
_
_
_
9
in common use
_
_
_
_
_
_
_
_
_
_
_
_
_
_
_
_
_
_
_
_
_
_
_
_
_
_
_
_
_
_
_
_
_
_
_
_
_
_
_
_
_
_
_
_
_
_
_
_
_
_
_
_
_
_
_
_
_
_
_
_
11
1.3.3
T
oolbar
_
_
_
_
_
_
_
_
_
_
_
_
_
_
_
_
_
_
_
_
_
_
_
_
_
_
_
_
_
_
_
_
_
_
_
_
_
_
_
_
_
_
_
_
_
_
_
_
_
_
_
_
_
_
_
_
_
_
_
_
_
_
_
_
_
14
1.3.4 File menu
_______________________________________________________________
15
1.4 Operation pr
ocess
_
_
_
_
_
_
_
_
_
_
_
_
_
_
_
_
_
_
_
_
_
_
_
_
_
_
_
_
_
_
_
_
_
_
_
_
_
_
_
_
_
_
_
_
_
_
_
_
_
_
_
_
_
_
_
_
_
_
_
_
_
_
16
1.4.1 Import files
_
_
_
_
_
_
_
_
_
_
_
_
_
_
_
_
_
_
_
_
_
_
_
_
_
_
_
_
_
_
_
_
_
_
_
_
_
_
_
_
_
_
_
_
_
_
_
_
_
_
_
_
_
_
_
_
_
_
_
_
_
_
17
1.4.2 Optimization tr
eatment
_
_
_
_
_
_
_
_
_
_
_
_
_
_
_
_
_
_
_
_
_
_
_
_
_
_
_
_
_
_
_
_
_
_
_
_
_
_
_
_
_
_
_
_
_
_
_
_
_
_
_
_
18
1.4.3 Pr
ocess setup
____________________________________________________________
19
1.4.4 Path optimization
_
_
_
_
_
_
_
_
_
_
_
_
_
_
_
_
_
_
_
_
_
_
_
_
_
_
_
_
_
_
_
_
_
_
_
_
_
_
_
_
_
_
_
_
_
_
_
_
_
_
_
_
_
_
_
_
_
22
1.4.5 Simulation inspection
_____________________________________________________
22
1.4.6 Start pr
ocessing
_
_
_
_
_
_
_
_
_
_
_
_
_
_
_
_
_
_
_
_
_
_
_
_
_
_
_
_
_
_
_
_
_
_
_
_
_
_
_
_
_
_
_
_
_
_
_
_
_
_
_
_
_
_
_
_
_
_
23
2. Graphic operation
_
_
_
_
_
_
_
_
_
_
_
_
_
_
_
_
_
_
_
_
_
_
_
_
_
_
_
_
_
_
_
_
_
_
_
_
_
_
_
_
_
_
_
_
_
_
_
_
_
_
_
_
_
_
_
_
_
_
_
_
_
_
_
_
_
_
_
25
2.1 Graphic display
_
_
_
_
_
_
_
_
_
_
_
_
_
_
_
_
_
_
_
_
_
_
_
_
_
_
_
_
_
_
_
_
_
_
_
_
_
_
_
_
_
_
_
_
_
_
_
_
_
_
_
_
_
_
_
_
_
_
_
_
_
_
_
_
25
2.2 Figur
e selection
_
_
_
_
_
_
_
_
_
_
_
_
_
_
_
_
_
_
_
_
_
_
_
_
_
_
_
_
_
_
_
_
_
_
_
_
_
_
_
_
_
_
_
_
_
_
_
_
_
_
_
_
_
_
_
_
_
_
_
_
_
_
_
_
27
2.3 Graphic editing
_
_
_
_
_
_
_
_
_
_
_
_
_
_
_
_
_
_
_
_
_
_
_
_
_
_
_
_
_
_
_
_
_
_
_
_
_
_
_
_
_
_
_
_
_
_
_
_
_
_
_
_
_
_
_
_
_
_
_
_
_
_
_
_
30
2.3.1 Size modification
_
_
_
_
_
_
_
_
_
_
_
_
_
_
_
_
_
_
_
_
_
_
_
_
_
_
_
_
_
_
_
_
_
_
_
_
_
_
_
_
_
_
_
_
_
_
_
_
_
_
_
_
_
_
_
_
_
30
2.3.2
Interactive graphical transformation
_
_
_
_
_
_
_
_
_
_
_
_
_
_
_
_
_
_
_
_
_
_
_
_
_
_
_
_
_
_
_
_
_
_
_
_
_
31
2.3.3 Quick translati
on, r
otation and mirr
or
_
_
_
_
_
_
_
_
_
_
_
_
_
_
_
_
_
_
_
_
_
_
_
_
_
_
_
_
_
_
_
_
_
_
_
_
_
_
_
32
2.3.4 In-pl
ace r
epl
icati
on
_
_
_
_
_
_
_
_
_
_
_
_
_
_
_
_
_
_
_
_
_
_
_
_
_
_
_
_
_
_
_
_
_
_
_
_
_
_
_
_
_
_
_
_
_
_
_
_
_
_
_
_
_
_
_
33
2.4 Captur
e tools
_
_
_
_
_
_
_
_
_
_
_
_
_
_
_
_
_
_
_
_
_
_
_
_
_
_
_
_
_
_
_
_
_
_
_
_
_
_
_
_
_
_
_
_
_
_
_
_
_
_
_
_
_
_
_
_
_
_
_
_
_
_
_
_
_
_
33
2.5 Draw graphics
_
_
_
_
_
_
_
_
_
_
_
_
_
_
_
_
_
_
_
_
_
_
_
_
_
_
_
_
_
_
_
_
_
_
_
_
_
_
_
_
_
_
_
_
_
_
_
_
_
_
_
_
_
_
_
_
_
_
_
_
_
_
_
_
_
34
2.5.1 Drawing basic graphics
_
_
_
_
_
_
_
_
_
_
_
_
_
_
_
_
_
_
_
_
_
_
_
_
_
_
_
_
_
_
_
_
_
_
_
_
_
_
_
_
_
_
_
_
_
_
_
_
_
_
_
_
34
2.5.2 Input commands to draw graphics
__________________________________________
35
2.5.3
T
ext input
_
_
_
_
_
_
_
_
_
_
_
_
_
_
_
_
_
_
_
_
_
_
_
_
_
_
_
_
_
_
_
_
_
_
_
_
_
_
_
_
_
_
_
_
_
_
_
_
_
_
_
_
_
_
_
_
_
_
_
_
_
_
_
36
2.5.4 Cr
eate standard parts
_
_
_
_
_
_
_
_
_
_
_
_
_
_
_
_
_
_
_
_
_
_
_
_
_
_
_
_
_
_
_
_
_
_
_
_
_
_
_
_
_
_
_
_
_
_
_
_
_
_
_
_
_
37
2.6 Graphic opti
mization
_
_
_
_
_
_
_
_
_
_
_
_
_
_
_
_
_
_
_
_
_
_
_
_
_
_
_
_
_
_
_
_
_
_
_
_
_
_
_
_
_
_
_
_
_
_
_
_
_
_
_
_
_
_
_
_
_
_
_
38
2.6.1 Remove small graphics
_
_
_
_
_
_
_
_
_
_
_
_
_
_
_
_
_
_
_
_
_
_
_
_
_
_
_
_
_
_
_
_
_
_
_
_
_
_
_
_
_
_
_
_
_
_
_
_
_
_
_
_
39
2.6.2 Remove duplicate l
ines
_
_
_
_
_
_
_
_
_
_
_
_
_
_
_
_
_
_
_
_
_
_
_
_
_
_
_
_
_
_
_
_
_
_
_
_
_
_
_
_
_
_
_
_
_
_
_
_
_
_
_
_
39
2.6.3 Merge the connecting lines
_
_
_
_
_
_
_
_
_
_
_
_
_
_
_
_
_
_
_
_
_
_
_
_
_
_
_
_
_
_
_
_
_
_
_
_
_
_
_
_
_
_
_
_
_
_
_
_
_
39
2.6.4 smoothing
_
_
_
_
_
_
_
_
_
_
_
_
_
_
_
_
_
_
_
_
_
_
_
_
_
_
_
_
_
_
_
_
_
_
_
_
_
_
_
_
_
_
_
_
_
_
_
_
_
_
_
_
_
_
_
_
_
_
_
_
_
_
_
39
2.6.5 Interrupted merging
_
_
_
_
_
_
_
_
_
_
_
_
_
_
_
_
_
_
_
_
_
_
_
_
_
_
_
_
_
_
_
_
_
_
_
_
_
_
_
_
_
_
_
_
_
_
_
_
_
_
_
_
_
_
40
2.6.6 Detonation
______________________________________________________________
41
3.Pr
ocess tools and pr
ocess parameters
_
_
_
_
_
_
_
_
_
_
_
_
_
_
_
_
_
_
_
_
_
_
_
_
_
_
_
_
_
_
_
_
_
_
_
_
_
_
_
_
_
_
_
_
_
_
_
_
_
_
_
43
3
3.1 Setting the starting point of the figure
_
_
_
_
_
_
_
_
_
_
_
_
_
_
_
_
_
_
_
_
_
_
_
_
_
_
_
_
_
_
_
_
_
_
_
_
_
_
_
_
_
_
_
_
_
43
3.1.1 Manual starting point
_
_
_
_
_
_
_
_
_
_
_
_
_
_
_
_
_
_
_
_
_
_
_
_
_
_
_
_
_
_
_
_
_
_
_
_
_
_
_
_
_
_
_
_
_
_
_
_
_
_
_
_
_
43
3.1.2
Automatic batch starting point
_
_
_
_
_
_
_
_
_
_
_
_
_
_
_
_
_
_
_
_
_
_
_
_
_
_
_
_
_
_
_
_
_
_
_
_
_
_
_
_
_
_
_
_
_
_
44
3.1.3 Longest straight line starting point
_
_
_
_
_
_
_
_
_
_
_
_
_
_
_
_
_
_
_
_
_
_
_
_
_
_
_
_
_
_
_
_
_
_
_
_
_
_
_
_
_
_
45
3.2 Graphic dir
ection setting
_
_
_
_
_
_
_
_
_
_
_
_
_
_
_
_
_
_
_
_
_
_
_
_
_
_
_
_
_
_
_
_
_
_
_
_
_
_
_
_
_
_
_
_
_
_
_
_
_
_
_
_
_
_
_
_
46
3.3 Common borders
______________________________________________________________
47
3.4 Graphic tool compensation
_
_
_
_
_
_
_
_
_
_
_
_
_
_
_
_
_
_
_
_
_
_
_
_
_
_
_
_
_
_
_
_
_
_
_
_
_
_
_
_
_
_
_
_
_
_
_
_
_
_
_
_
_
_
48
3.4.2 External contraction and internal expansion
_
_
_
_
_
_
_
_
_
_
_
_
_
_
_
_
_
_
_
_
_
_
_
_
_
_
_
_
_
_
_
_
_
_
50
3.4.3
T
otal contraction
_________________________________________________________
51
3.4.4
All
external expansion
_
_
_
_
_
_
_
_
_
_
_
_
_
_
_
_
_
_
_
_
_
_
_
_
_
_
_
_
_
_
_
_
_
_
_
_
_
_
_
_
_
_
_
_
_
_
_
_
_
_
_
_
_
51
3.4.5
Angle type
_
_
_
_
_
_
_
_
_
_
_
_
_
_
_
_
_
_
_
_
_
_
_
_
_
_
_
_
_
_
_
_
_
_
_
_
_
_
_
_
_
_
_
_
_
_
_
_
_
_
_
_
_
_
_
_
_
_
_
_
_
_
_
51
3.4.6 Compensation, same layer
_________________________________________________
52
3.5 Regional carving
_
_
_
_
_
_
_
_
_
_
_
_
_
_
_
_
_
_
_
_
_
_
_
_
_
_
_
_
_
_
_
_
_
_
_
_
_
_
_
_
_
_
_
_
_
_
_
_
_
_
_
_
_
_
_
_
_
_
_
_
_
_
_
54
3.5.1
Y
ang carving and
Y
in carving
_
_
_
_
_
_
_
_
_
_
_
_
_
_
_
_
_
_
_
_
_
_
_
_
_
_
_
_
_
_
_
_
_
_
_
_
_
_
_
_
_
_
_
_
_
_
_
54
3.5.2 Row cutting tool
and ring cutting tool
_
_
_
_
_
_
_
_
_
_
_
_
_
_
_
_
_
_
_
_
_
_
_
_
_
_
_
_
_
_
_
_
_
_
_
_
_
_
_
_
55
3.5.3 Ring cutting and tool r
emoval
______________________________________________
56
3.6 Reverse cut compensation
_
_
_
_
_
_
_
_
_
_
_
_
_
_
_
_
_
_
_
_
_
_
_
_
_
_
_
_
_
_
_
_
_
_
_
_
_
_
_
_
_
_
_
_
_
_
_
_
_
_
_
_
_
_
_
57
3.7 Dispersal and gr
oupi
ng
_________________________________________________________
60
3.7.1 Combined samples
_
_
_
_
_
_
_
_
_
_
_
_
_
_
_
_
_
_
_
_
_
_
_
_
_
_
_
_
_
_
_
_
_
_
_
_
_
_
_
_
_
_
_
_
_
_
_
_
_
_
_
_
_
_
_
_
60
3.8
Array
________________________________________________________________________
62
3.8.1 Rectangular
array
_
_
_
_
_
_
_
_
_
_
_
_
_
_
_
_
_
_
_
_
_
_
_
_
_
_
_
_
_
_
_
_
_
_
_
_
_
_
_
_
_
_
_
_
_
_
_
_
_
_
_
_
_
_
_
_
62
3.8.2 Ring array
_
_
_
_
_
_
_
_
_
_
_
_
_
_
_
_
_
_
_
_
_
_
_
_
_
_
_
_
_
_
_
_
_
_
_
_
_
_
_
_
_
_
_
_
_
_
_
_
_
_
_
_
_
_
_
_
_
_
_
_
_
_
63
3.8.2 Interactive arrays
_
_
_
_
_
_
_
_
_
_
_
_
_
_
_
_
_
_
_
_
_
_
_
_
_
_
_
_
_
_
_
_
_
_
_
_
_
_
_
_
_
_
_
_
_
_
_
_
_
_
_
_
_
_
_
_
64
3.9 Sorting
_
_
_
_
_
_
_
_
_
_
_
_
_
_
_
_
_
_
_
_
_
_
_
_
_
_
_
_
_
_
_
_
_
_
_
_
_
_
_
_
_
_
_
_
_
_
_
_
_
_
_
_
_
_
_
_
_
_
_
_
_
_
_
_
_
_
_
_
_
_
_
65
3.9.1 Sequence Pr
eview
_
_
_
_
_
_
_
_
_
_
_
_
_
_
_
_
_
_
_
_
_
_
_
_
_
_
_
_
_
_
_
_
_
_
_
_
_
_
_
_
_
_
_
_
_
_
_
_
_
_
_
_
_
_
_
_
65
3.9.2 Manual sorting
_
_
_
_
_
_
_
_
_
_
_
_
_
_
_
_
_
_
_
_
_
_
_
_
_
_
_
_
_
_
_
_
_
_
_
_
_
_
_
_
_
_
_
_
_
_
_
_
_
_
_
_
_
_
_
_
_
_
_
66
3.9.3
Automatic sorting
_
_
_
_
_
_
_
_
_
_
_
_
_
_
_
_
_
_
_
_
_
_
_
_
_
_
_
_
_
_
_
_
_
_
_
_
_
_
_
_
_
_
_
_
_
_
_
_
_
_
_
_
_
_
_
_
66
3.10 Chamfer
_
_
_
_
_
_
_
_
_
_
_
_
_
_
_
_
_
_
_
_
_
_
_
_
_
_
_
_
_
_
_
_
_
_
_
_
_
_
_
_
_
_
_
_
_
_
_
_
_
_
_
_
_
_
_
_
_
_
_
_
_
_
_
_
_
_
_
_
_
69
3.10.1 Round corners
_
_
_
_
_
_
_
_
_
_
_
_
_
_
_
_
_
_
_
_
_
_
_
_
_
_
_
_
_
_
_
_
_
_
_
_
_
_
_
_
_
_
_
_
_
_
_
_
_
_
_
_
_
_
_
_
_
_
69
3.10.2 Inverted concave
Angle
_
_
_
_
_
_
_
_
_
_
_
_
_
_
_
_
_
_
_
_
_
_
_
_
_
_
_
_
_
_
_
_
_
_
_
_
_
_
_
_
_
_
_
_
_
_
_
_
_
_
_
70
3.10.3 Inverted chamfer
_
_
_
_
_
_
_
_
_
_
_
_
_
_
_
_
_
_
_
_
_
_
_
_
_
_
_
_
_
_
_
_
_
_
_
_
_
_
_
_
_
_
_
_
_
_
_
_
_
_
_
_
_
_
_
_
71
3.10.4 Inverted chamfer
_
_
_
_
_
_
_
_
_
_
_
_
_
_
_
_
_
_
_
_
_
_
_
_
_
_
_
_
_
_
_
_
_
_
_
_
_
_
_
_
_
_
_
_
_
_
_
_
_
_
_
_
_
_
_
_
72
3.1
1
Alignment tools
_
_
_
_
_
_
_
_
_
_
_
_
_
_
_
_
_
_
_
_
_
_
_
_
_
_
_
_
_
_
_
_
_
_
_
_
_
_
_
_
_
_
_
_
_
_
_
_
_
_
_
_
_
_
_
_
_
_
_
_
_
_
_
74
3.12 Closeness
_
_
_
_
_
_
_
_
_
_
_
_
_
_
_
_
_
_
_
_
_
_
_
_
_
_
_
_
_
_
_
_
_
_
_
_
_
_
_
_
_
_
_
_
_
_
_
_
_
_
_
_
_
_
_
_
_
_
_
_
_
_
_
_
_
_
_
_
75
3.13 Integration function
_
_
_
_
_
_
_
_
_
_
_
_
_
_
_
_
_
_
_
_
_
_
_
_
_
_
_
_
_
_
_
_
_
_
_
_
_
_
_
_
_
_
_
_
_
_
_
_
_
_
_
_
_
_
_
_
_
_
_
76
3.14 Cir
cul
ar
fusion
_______________________________________________________________
77
3.15 Leads
_______________________________________________________________________
77
3.16
Add the outer
frame
_
_
_
_
_
_
_
_
_
_
_
_
_
_
_
_
_
_
_
_
_
_
_
_
_
_
_
_
_
_
_
_
_
_
_
_
_
_
_
_
_
_
_
_
_
_
_
_
_
_
_
_
_
_
_
_
_
_
_
78
3.17 Measuring tools
_
_
_
_
_
_
_
_
_
_
_
_
_
_
_
_
_
_
_
_
_
_
_
_
_
_
_
_
_
_
_
_
_
_
_
_
_
_
_
_
_
_
_
_
_
_
_
_
_
_
_
_
_
_
_
_
_
_
_
_
_
_
_
79
4. Pr
ocessing contr
ol
_
_
_
_
_
_
_
_
_
_
_
_
_
_
_
_
_
_
_
_
_
_
_
_
_
_
_
_
_
_
_
_
_
_
_
_
_
_
_
_
_
_
_
_
_
_
_
_
_
_
_
_
_
_
_
_
_
_
_
_
_
_
_
_
_
_
_
80
4.1 Coordinate system
_____________________________________________________________
80
4.1.1 Original zer
o point
_
_
_
_
_
_
_
_
_
_
_
_
_
_
_
_
_
_
_
_
_
_
_
_
_
_
_
_
_
_
_
_
_
_
_
_
_
_
_
_
_
_
_
_
_
_
_
_
_
_
_
_
_
_
_
_
81
4.1.2
W
orkpi
ece zer
o point
_
_
_
_
_
_
_
_
_
_
_
_
_
_
_
_
_
_
_
_
_
_
_
_
_
_
_
_
_
_
_
_
_
_
_
_
_
_
_
_
_
_
_
_
_
_
_
_
_
_
_
_
_
_
82
4.1.2 Find the zer
o point after
anomaly
_
_
_
_
_
_
_
_
_
_
_
_
_
_
_
_
_
_
_
_
_
_
_
_
_
_
_
_
_
_
_
_
_
_
_
_
_
_
_
_
_
_
_
82
4
4.2
Alarm
_
_
_
_
_
_
_
_
_
_
_
_
_
_
_
_
_
_
_
_
_
_
_
_
_
_
_
_
_
_
_
_
_
_
_
_
_
_
_
_
_
_
_
_
_
_
_
_
_
_
_
_
_
_
_
_
_
_
_
_
_
_
_
_
_
_
_
_
_
_
_
_
83
4.3 Soft limit
_____________________________________________________________________
84
4.4 Manual testing
_
_
_
_
_
_
_
_
_
_
_
_
_
_
_
_
_
_
_
_
_
_
_
_
_
_
_
_
_
_
_
_
_
_
_
_
_
_
_
_
_
_
_
_
_
_
_
_
_
_
_
_
_
_
_
_
_
_
_
_
_
_
_
_
_
85
4.5 Blade cutting
_
_
_
_
_
_
_
_
_
_
_
_
_
_
_
_
_
_
_
_
_
_
_
_
_
_
_
_
_
_
_
_
_
_
_
_
_
_
_
_
_
_
_
_
_
_
_
_
_
_
_
_
_
_
_
_
_
_
_
_
_
_
_
_
_
_
85
4.5.1 Manual tool setting
_______________________________________________________
86
4.5.2
Automatic tool cutting
_
_
_
_
_
_
_
_
_
_
_
_
_
_
_
_
_
_
_
_
_
_
_
_
_
_
_
_
_
_
_
_
_
_
_
_
_
_
_
_
_
_
_
_
_
_
_
_
_
_
_
_
_
86
4.5.3 Fine-tuning the blade depth
_
_
_
_
_
_
_
_
_
_
_
_
_
_
_
_
_
_
_
_
_
_
_
_
_
_
_
_
_
_
_
_
_
_
_
_
_
_
_
_
_
_
_
_
_
_
_
_
87
4.6
W
alk the border
_______________________________________________________________
87
4.7 Pr
ocessing, stopping, pausing and continuing
_
_
_
_
_
_
_
_
_
_
_
_
_
_
_
_
_
_
_
_
_
_
_
_
_
_
_
_
_
_
_
_
_
_
_
_
_
_
_
87
4.7.1 Pr
ocessing
_
_
_
_
_
_
_
_
_
_
_
_
_
_
_
_
_
_
_
_
_
_
_
_
_
_
_
_
_
_
_
_
_
_
_
_
_
_
_
_
_
_
_
_
_
_
_
_
_
_
_
_
_
_
_
_
_
_
_
_
_
_
_
87
4.7.2 Stop
_
_
_
_
_
_
_
_
_
_
_
_
_
_
_
_
_
_
_
_
_
_
_
_
_
_
_
_
_
_
_
_
_
_
_
_
_
_
_
_
_
_
_
_
_
_
_
_
_
_
_
_
_
_
_
_
_
_
_
_
_
_
_
_
_
_
_
_
89
4.7.3 Suspension and continuation
_______________________________________________
89
4.7.4
Advanced Start
_
_
_
_
_
_
_
_
_
_
_
_
_
_
_
_
_
_
_
_
_
_
_
_
_
_
_
_
_
_
_
_
_
_
_
_
_
_
_
_
_
_
_
_
_
_
_
_
_
_
_
_
_
_
_
_
_
_
_
89
4.8 Parti
tioning
_
_
_
_
_
_
_
_
_
_
_
_
_
_
_
_
_
_
_
_
_
_
_
_
_
_
_
_
_
_
_
_
_
_
_
_
_
_
_
_
_
_
_
_
_
_
_
_
_
_
_
_
_
_
_
_
_
_
_
_
_
_
_
_
_
_
_
90
4.8.2
Application scenarios of partitioned adsorption mode
__________________________
90
4.9 Pull
ing material
_
_
_
_
_
_
_
_
_
_
_
_
_
_
_
_
_
_
_
_
_
_
_
_
_
_
_
_
_
_
_
_
_
_
_
_
_
_
_
_
_
_
_
_
_
_
_
_
_
_
_
_
_
_
_
_
_
_
_
_
_
_
_
_
92
4.9.1 Multipl
e machining operations for
general machining
_
_
_
_
_
_
_
_
_
_
_
_
_
_
_
_
_
_
_
_
_
_
_
_
_
_
93
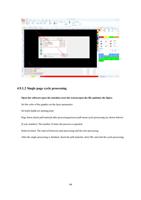
4.9.1.1 Single page pr
ocessing
As shown in the following figur
e:
_
_
_
_
_
_
_
_
_
_
_
_
_
_
_
_
_
_
_
93
4.9.1.2 Single page cycle pr
ocessing
__________________________________________
94
4.9.1.3 Page pr
ocessing
_
_
_
_
_
_
_
_
_
_
_
_
_
_
_
_
_
_
_
_
_
_
_
_
_
_
_
_
_
_
_
_
_
_
_
_
_
_
_
_
_
_
_
_
_
_
_
_
_
_
_
_
_
95
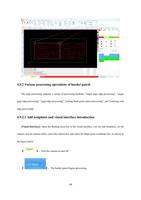
4.9.2
V
arious pr
ocessing operations of border
patr
ol
_
_
_
_
_
_
_
_
_
_
_
_
_
_
_
_
_
_
_
_
_
_
_
_
_
_
_
_
_
_
_
_
96
4.9.2.1
Add templates and visual interface intr
oduction
_
_
_
_
_
_
_
_
_
_
_
_
_
_
_
_
_
_
_
_
_
_
_
_
_
_
96
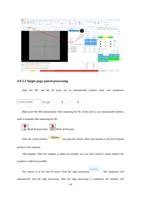
4.9.2.2 Single page patr
ol pr
ocessing
_
_
_
_
_
_
_
_
_
_
_
_
_
_
_
_
_
_
_
_
_
_
_
_
_
_
_
_
_
_
_
_
_
_
_
_
_
_
_
_
_
97
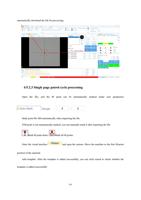
4.9.2.3 Single page patr
ol cycle pr
ocessing
_
_
_
_
_
_
_
_
_
_
_
_
_
_
_
_
_
_
_
_
_
_
_
_
_
_
_
_
_
_
_
_
_
_
_
_
_
98
4.9.2.4 Page border
pr
ocessing
______________________________________________
99
4.9.2.5 Cutting Mark mirr
or
pr
ocessing
_
_
_
_
_
_
_
_
_
_
_
_
_
_
_
_
_
_
_
_
_
_
_
_
_
_
_
_
_
_
_
_
_
_
_
_
_
_
101
4.9.2.6 Scanning code for
border
pr
ocessing
_
_
_
_
_
_
_
_
_
_
_
_
_
_
_
_
_
_
_
_
_
_
_
_
_
_
_
_
_
_
_
_
_
_
103
5. System auxiliary functions
_
_
_
_
_
_
_
_
_
_
_
_
_
_
_
_
_
_
_
_
_
_
_
_
_
_
_
_
_
_
_
_
_
_
_
_
_
_
_
_
_
_
_
_
_
_
_
_
_
_
_
_
_
_
_
_
_
_
_
106
5.1 Board upgrade
_______________________________________________________________
106
5.2 Parameter
export and parameter
import
_
_
_
_
_
_
_
_
_
_
_
_
_
_
_
_
_
_
_
_
_
_
_
_
_
_
_
_
_
_
_
_
_
_
_
_
_
_
_
_
_
_
107
5.3
T
able test
_
_
_
_
_
_
_
_
_
_
_
_
_
_
_
_
_
_
_
_
_
_
_
_
_
_
_
_
_
_
_
_
_
_
_
_
_
_
_
_
_
_
_
_
_
_
_
_
_
_
_
_
_
_
_
_
_
_
_
_
_
_
_
_
_
_
_
_
108
5.3.1 Configur
e the test IO signal on the console
_
_
_
_
_
_
_
_
_
_
_
_
_
_
_
_
_
_
_
_
_
_
_
_
_
_
_
_
_
_
_
_
_
_
_
109
5.3.2 Configuration of desktop data
_
_
_
_
_
_
_
_
_
_
_
_
_
_
_
_
_
_
_
_
_
_
_
_
_
_
_
_
_
_
_
_
_
_
_
_
_
_
_
_
_
_
_
_
_
109
5.3.3 Bench test
_
_
_
_
_
_
_
_
_
_
_
_
_
_
_
_
_
_
_
_
_
_
_
_
_
_
_
_
_
_
_
_
_
_
_
_
_
_
_
_
_
_
_
_
_
_
_
_
_
_
_
_
_
_
_
_
_
_
_
_
_
_
111
5.3.4
V
iew the surface data
____________________________________________________
112
5.3.5 Export/import of console data
_
_
_
_
_
_
_
_
_
_
_
_
_
_
_
_
_
_
_
_
_
_
_
_
_
_
_
_
_
_
_
_
_
_
_
_
_
_
_
_
_
_
_
_
_
113
5.3.6 Enable surface compensation
_
_
_
_
_
_
_
_
_
_
_
_
_
_
_
_
_
_
_
_
_
_
_
_
_
_
_
_
_
_
_
_
_
_
_
_
_
_
_
_
_
_
_
_
_
_
113
5.4 Language modification
_
_
_
_
_
_
_
_
_
_
_
_
_
_
_
_
_
_
_
_
_
_
_
_
_
_
_
_
_
_
_
_
_
_
_
_
_
_
_
_
_
_
_
_
_
_
_
_
_
_
_
_
_
_
_
_
_
114
5.5 Diagnosis and log viewing
______________________________________________________
114
5.7 Shortcuts
_
_
_
_
_
_
_
_
_
_
_
_
_
_
_
_
_
_
_
_
_
_
_
_
_
_
_
_
_
_
_
_
_
_
_
_
_
_
_
_
_
_
_
_
_
_
_
_
_
_
_
_
_
_
_
_
_
_
_
_
_
_
_
_
_
_
_
_
116
6.Common pr
oblems and tr
eatment
_
_
_
_
_
_
_
_
_
_
_
_
_
_
_
_
_
_
_
_
_
_
_
_
_
_
_
_
_
_
_
_
_
_
_
_
_
_
_
_
_
_
_
_
_
_
_
_
_
_
_
_
_
117
6.1
T
ool debugging
___________________________________________________________________
117
6.1.1
Angle offset
_
_
_
_
_
_
_
_
_
_
_
_
_
_
_
_
_
_
_
_
_
_
_
_
_
_
_
_
_
_
_
_
_
_
_
_
_
_
_
_
_
_
_
_
_
_
_
_
_
_
_
_
_
_
_
_
_
_
_
_
_
117
6.1.2 Blade tip offset
_
_
_
_
_
_
_
_
_
_
_
_
_
_
_
_
_
_
_
_
_
_
_
_
_
_
_
_
_
_
_
_
_
_
_
_
_
_
_
_
_
_
_
_
_
_
_
_
_
_
_
_
_
_
_
_
_
_
120
5
6.2 Offset test
_
_
_
_
_
_
_
_
_
_
_
_
_
_
_
_
_
_
_
_
_
_
_
_
_
_
_
_
_
_
_
_
_
_
_
_
_
_
_
_
_
_
_
_
_
_
_
_
_
_
_
_
_
_
_
_
_
_
_
_
_
_
_
_
_
_
_
_
124
6.2.1
T
ool holder
offset
_
_
_
_
_
_
_
_
_
_
_
_
_
_
_
_
_
_
_
_
_
_
_
_
_
_
_
_
_
_
_
_
_
_
_
_
_
_
_
_
_
_
_
_
_
_
_
_
_
_
_
_
_
_
_
_
125
6.2.2 Camera offset test
_______________________________________________________
125
6.2.3 Dual head offset test
_____________________________________________________
126
6.3
T
ool compensation
____________________________________________________________
127
6.3.1 Blade l
ifting and blade falling compensation
_
_
_
_
_
_
_
_
_
_
_
_
_
_
_
_
_
_
_
_
_
_
_
_
_
_
_
_
_
_
_
_
_
127
6.3.2 Blade compensation
_
_
_
_
_
_
_
_
_
_
_
_
_
_
_
_
_
_
_
_
_
_
_
_
_
_
_
_
_
_
_
_
_
_
_
_
_
_
_
_
_
_
_
_
_
_
_
_
_
_
_
_
_
_
129
6.3.3 Blade radi
us compensation
_
_
_
_
_
_
_
_
_
_
_
_
_
_
_
_
_
_
_
_
_
_
_
_
_
_
_
_
_
_
_
_
_
_
_
_
_
_
_
_
_
_
_
_
_
_
_
_
130
6.4
The device is not connected
_
_
_
_
_
_
_
_
_
_
_
_
_
_
_
_
_
_
_
_
_
_
_
_
_
_
_
_
_
_
_
_
_
_
_
_
_
_
_
_
_
_
_
_
_
_
_
_
_
_
_
_
_
130
6
1. Quick Start
1.1 Featur
es
Xing
multidimensional
cutting
machine
control
software
is
a
comprehensive
cutting
control
software
specially
developed
for
clothing,
advertising
and
other
flexibl
e
material
cutting.
It
s
main
features
are
as
follows:
Supports
parsing
of
various
formats
such
as
dwg,
dxf,
t
xt,
nc,
ai,
eps,
pdf,
plt,
xdw
,
jpg,
tif,
bmp,
png,
etc., providing convenience for users to make files;
When
opening
or
im
porting
a
file,
t
he
fil
e
will
be
optimized
automatically
,
including
deleting
small
graphics,
removing
repeated
lines,
automat
ically
mer
ging
connected
lines,
smoothing
processing,
setting starting points automatically
, sorting and adjusting cutting direction automatically;
Optimized
functions
such
as
aut
omatic
com
pensati
on
can
be
manually
executed,
turned
on
or
turned
of
f;
Supports
common
functions
of
CAD,
including
size
modification,
translation,
mirror
,
rotation,
alignment, copy
, array
, etc.;
In
the
WYSIWYG
mode,
paramet
ers
such
as
lead-in
and
lead-out
lines,
tool
compensation,
micro
connection, bri
dge and so on can be easily set;
Support
curve
segmentation
and
mer
ging,
curve
smoothing
processing,
as
well
as
part
mer
ging
and
breaking operations;
It
has
the
functi
on
of
autom
atic
sampling
which
saves
ti
me
and
ef
fort,
can
realize
automatic
common
edge and generate surplus material;
Through a variety of array methods, it can easily complete the layout of the plate;
Flexible
and
diverse
aut
omatic
sorting
and
manual
sorting
functions,
support
through
group
lock
the
processing order of graphics within t
he group;
Supports viewing the processing order and previewing the cutting order through simulated processing;
The cutting depth of the graphic file can be set, and the layered cutti
ng and the adjustment of the amount
of each cut can be supported;
Supports breakpoint processing, which records the li
ne number when the processing stops or pauses, so
as to facilitate the subsequent return to that posi
tion to complete the remaining processing tasks;
Support
power
failure
continuation
processing.
If
there
is
an
unexpected
power
failure
during
7
processing,
you
can
choose
the
power
failure
continuation
mode
after
power
supply
is
restored
to
continue processing from the posit
ion before power failure;
Support
CCD
camera
vision
calibration;
support
printing
inkjet,
labeling,
automatic
feeding
and
pushing, projection, sorting, lar
ge vision, layout of materials and many other extended functions.
1.2 Obtain and install software
Y
ou
can
contact
your
supplier
or
customer
service
personnel
t
o
obtain
the
software
installati
on
program,
or
you
can
download
the
install
ation
program
from
Xingduowei's
of
ficial
website.
Before
installing
the
software, please check whether your computer meets the following installation requirements:
Win7 or above operat
ing system
I4 or higher CPU
At least 4GB of memory
15 VGA display above 1 inch, resolution above 1280*1024, recommended 32-bit true color
above
If you are using a Vista-based computer system, run it as an administrator to avoid errors.
After the check, run the installer directly. For Vista, right-click and run the i
nstaller as an
administrator.
To
prevent
program
modifications
during
instal
lation
and
ensure
proper
installation,
please
disable
Securi
ty
Guard
and
antivirus
software
before
proceeding.
Antivirus
software
cannot
guarantee
a
completely
virus-free
computer.
If
your
device
is
already
infected
with
vi
ruses
while
the
antivirus
is
active,
it
may
mistakenly
flag
Icut
as
a
virus,
potentiall
y
causing
Icut
to
be
incorrectly
identified as malici
ous.
1.3 Start using
1.3.1 Desktop shortcut icon opening mode
8
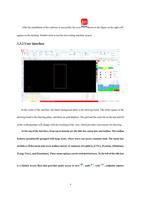
After the instal
lation of the software is successful, the icon
shown in the figure on the right will
appear on the desktop. Double-cli
ck to run t
he Icut cutting machine system.
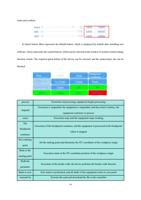
1.3.2 User interface
In
the
center
of
the
interface,
the
black
background
pl
ate
is
the
drawing
board.
The
white
square
in
t
he
drawing
board
is
the
drawing
plane,
and
there
are
grid
displays.
The
grid
and
the
scale
bar
on
the
top
and
left
of the working pl
ane will change with the zooming of the view
, which provides convenience for drawing.
At
the
top
of
the
interface,
fr
om
top
to
bottom
ar
e
the
title
bar
,
menu
bar
,
and
toolbar
.
The
toolbar
featur
es
pr
ominentl
y
gr
ouped
w
i
th
large
i
cons,
wher
e
users
can
access
common
tools.
The
menu
bar
includes
a
[Fi
le]
menu
and
seven
tool
bar
menus:
[Common],
[Graphics],
[CNC],
[System],
[Simulate],
[Large
V
iew],
and
[Functions].
These
menu
options
can
be
switched
between.
T
o
the
left
of
the
title
bar
is
a
[Quick
Access
Bar]
that
pr
ovides
quick
access
to
save
,
undo
,
r
edo
,
endpoint
captur
e
9
, and intersection captur
e functions
.
The
left
side
of
the
drawing
panel
features
a
shortcut
toolbar
,
which
w
e
refer
to
as
the
"navigation
bar"
in
subsequent
expl
anations.
Thi
s
section
provides
quick
access
to
essential
drawing
funct
ions.
From
top
to
bottom,
the
first
four
tools
are
[Select],
[Pan],
[Main
V
iew],
and
[Quick
Hover
T
oolbar].
Below
these
are
corresponding drawing tool options that can be selected by cli
cking.
At the bottom is the measurement tool.
The
ri
ght
side
of
the
drawing
panel
features
a
layer
toolbar
,
arranged
from
top
to
bottom:
The
first
button
is
[Open
Process
Settings]
,
followed
by
[Layer
Selection]
(buttons
2
-13
)
–
a
total
of
12
color
layer
buttons
corresponding
to
each
layer
.
After
selecting
a
graphi
c,
clicking
t
he
corresponding
layer
color
will
autom
aticall
y
apply
that
layer's
color
to
the
selected
shape.
Mark
points
can
be
created
for
selected
shapes.
A
one-click
command
marks
all
selected
points
.
Clearing
all
marked
points
can
be
done
by
clicking the corresponding button
.
The
interface
features
three
vertically
arranged
display
windows.
The
top
window
serves
as
the
drawing
information
display
area,
where
all
drawing
command
prompts
and
input
data
are
shown.
The
middle
window
displays
system
information
(excluding
drawing-related
detai
ls),
including
system
logs
wit
h
timestamp
markers
and
color
-coded
alert
s
(operation,
warning,
alarm).
The
bot
tom
window
shows
processing
stat
istics.
The
ri
ght
side
displays
coordinat
e
positions
(machine
coordinates
and
10
"
Do you need help?
Call Me Back
"
Do you need help?
Call Me Back
"
Do you need help?
Call Me Back