Home
3D
PrintUP 3D Printer
PioCreat 3D Printer
Printers
FastCOLOUR >>
ATools
DTF Textile
UV-DTF
FlatPRINT
PrintExp
InkRIP
Lasers
TruCUT CO
2
>>
TruCUT RDWorks
TruCUT 2020+
TruCUT Express
TruCUT Lite >>
4030 & Vertical Software
4030 & Vertical Documents
New 6040 Desktop
LabelMark
RayCUT
MorCUT >>
MorCUT-Cyclops
LaserMaster
Plasmas
MetalWise
Fabricam
Routers
EasyRoute
PowerRoute
Blade Cutters
Vinyl Cutters >>
V-Series
V-Smart
V-Auto (& V-Smart+)
Vinyl4
Flatbed Cutters >>
FlatCUT
Label Cutters >>
V-Auto Label Cutters
Software >>
VinylCut
More
FastCUT
Heatware
Rollman
ScreenMaster
Other Software
Miscellaneous
AM.CO.ZA
/
Buy CNC Software
/
CNC Software Training
/
CNC Software Downloads
Sales: 072 222 2211
Support: 076 666 6655
Training: 060 818 1818
Jo’burg: 087 802 5368
Cape Town: 087 802 7106
An
Project
Multimedia
Univision Videos
#SortIT Videos
MakersLab.TV
Software Training
Welldone Gallery
Updates
Prevision Blog
Cornerstone Trust
Email Campaigns
Contact Us
Sales WhatsApp
060 600 6000
Support WhatsApp
060 600 7000
Johannesburg Headquarters
011 397 1429
087 802 5368
Cape Town Showroom
021 555 3250
087 802 7106
Links
CNC Machine Repair
Vinyl Cutter
Heatware
You are here:
AM.CO.ZA
Buythis
CNC Utilities Homepage
FastCOLOUR-Printer
SAi FlexiPRINT Ver_19 AM.CO.ZA Cloud Edition
Util
Mimaki Firewire
InstallGuide(en).pdf
Page 5 of 10
1
Computer
Pentium
processor
supplied
with
the
IEEE1394port*
2
,
IBM
PC
supplied
with
the
compatible
processor
,
o
r
p
r
o
c
e
s
s
o
r
s
O
S
M
i
c
r
o
s
o
f
t
®
W
i
n
d
o
w
s
®
2
0
0
0
P
r
o
f
e
s
s
i
o
n
a
l
(
s
e
r
v
i
c
e
p
a
c
k
2
o
r
l
a
t
e
r
)
M
i
c
r
o
s
o
f
t
®
W
i
n
d
o
w
s
®
X
P
P
r
o
f
e
s
s
i
o
n
a
l
/
H
o
m
e
E
d
i
t
i
o
n
C
P
U
P
e
n
t
i
u
m
II
300MHz
or
higher*
3
M
e
m
o
r
y
1
2
8
M
B
o
r
m
o
r
e
*
3
P
l
o
t
t
e
r
M
i
m
a
k
i
p
l
o
t
t
e
r
s
s
u
p
p
l
i
e
d
w
i
t
h
I
E
E
E
1
3
9
4
p
o
r
t
(JV4/JV3/JV22/TX2/TX3/DM2/DM3/GP/UJV/UJF
series)
Number
of
protter
1
to
4
*
4
*
5
c
o
n
n
e
c
t
a
b
l
e
*
1
I
E
E
E
1
3
9
4
D
r
i
v
e
r
I
n
s
t
a
l
l
G
u
i
d
e
T
h
i
s
g
u
i
d
e
e
x
p
l
a
i
n
s
t
h
e
I
E
E
E
1
3
9
4
d
r
i
v
e
r
i
n
s
t
a
l
l
a
t
i
o
n
p
r
o
c
e
d
u
r
e
.
I
E
E
E
1
3
9
4
d
r
i
v
e
r
m
u
s
t
b
e
i
n
s
t
a
l
l
e
d
o
n
t
h
e
c
o
m
p
u
t
e
r
t
o
u
s
e
t
h
e
I
E
E
E
1
3
9
4
i
n
t
e
r
f
a
c
e
.
(
I
E
E
E
1
3
9
4
c
a
b
l
e
i
s
s
o
l
d
s
e
p
a
r
a
t
e
l
y
)
Read
the
guide
carefully
before
installing
the
IEEE1394
dri
v
e
r
.
System Requirements
The following conditions are required to use IEEE1394 driver
.
D201093
*
1
:
T
h
e
n
u
m
b
e
r
o
f
p
l
o
t
t
e
r
a
b
l
e
t
o
c
o
n
n
e
c
t
t
o
o
n
e
c
o
m
p
u
t
e
r
.
*
2
:
T
o
w
a
r
d
a
I
E
E
E
1
3
9
4
P
C
I
b
o
a
r
d
,
o
r
a
I
E
E
E
1
3
9
4
P
C
c
a
r
d
,
O
n
l
y
o
n
e
p
l
o
t
t
e
r
c
a
n
b
e
c
o
n
n
e
c
t
e
d
(
E
v
e
n
t
h
o
u
g
h
I
E
E
E
1
3
9
4
P
C
I
b
o
a
r
d
h
a
v
e
m
u
l
t
i
p
l
e
I
E
E
E
1
3
9
4
p
o
r
t
)
.
T
o
c
o
n
n
e
c
t
m
u
l
t
i
p
l
e
p
l
o
t
t
e
r
t
o
o
n
e
c
o
m
p
u
t
e
r
,
I
E
E
E
1
3
9
4
P
C
I
b
o
a
r
d
o
r
I
E
E
E
1
3
9
4
P
C
c
a
r
d
w
i
l
l
b
e
n
e
e
d
e
d
s
a
m
e
n
u
m
b
e
r
a
s
p
l
o
t
t
e
r
.
*
3
:
W
h
e
n
o
u
t
p
u
t
t
h
e
s
a
m
e
d
a
t
a
t
o
m
u
l
t
i
p
l
e
p
l
o
t
t
e
r
s
a
t
t
h
e
s
a
m
e
t
i
m
e
,
e
n
o
u
g
h
o
u
t
p
u
t
p
e
r
f
o
r
m
a
n
c
e
m
a
y
n
o
t
b
e
o
b
t
a
i
n
e
d
d
e
p
e
n
d
o
n
t
h
e
u
s
e
e
n
v
i
r
o
n
m
e
n
t
.
C
o
n
f
i
r
m
t
h
e
s
p
e
c
i
f
i
c
a
t
i
o
n
o
f
t
h
e
a
p
p
l
i
c
a
t
i
o
n
.
*
4
:
C
o
n
n
e
c
t
a
b
l
e
p
l
o
t
t
e
r
n
u
m
b
e
r
m
a
y
l
i
m
i
t
e
d
l
e
s
s
t
h
a
n
f
o
u
r
d
e
p
e
n
d
i
n
g
o
n
t
h
e
c
o
m
p
u
t
e
r
s
p
e
c
i
f
i
c
a
t
i
o
n
o
f
b
o
a
r
d
a
b
l
e
n
u
m
b
e
r
o
f
I
E
E
E
1
3
9
4
P
C
I
b
o
a
r
d
o
r
a
I
E
E
E
1
3
9
4
P
C
c
a
r
d
.
*
5
:
T
o
c
o
n
n
e
c
t
m
u
l
t
i
p
l
e
p
l
o
t
t
e
r
s
t
o
o
n
e
c
o
m
p
u
t
e
r
,
t
h
e
a
p
p
l
i
c
a
t
i
o
n
s
h
o
u
l
d
s
u
p
p
o
r
t
t
h
e
m
u
l
t
i
p
l
e
p
l
o
t
t
e
r
c
o
n
n
e
c
t
i
o
n
.
C
o
n
f
i
r
m
t
h
e
s
p
e
c
i
f
i
c
a
t
i
o
n
o
f
t
h
e
a
p
p
l
i
c
a
t
i
o
n
.
Plotter #2
Plotter #1
IEEE1394
cable
IEEE1394
PCI board
Multiple
plloter
connection
figure
U
s
e
o
n
e
p
o
r
t
o
n
l
y
,
e
v
e
n
I
E
E
E
1
3
9
4
P
C
I
b
o
a
r
d
h
a
v
e
m
u
l
t
i
p
l
e
p
o
r
t
s
.
2
C
a
u
t
i
o
n
Follow the below conditions to use
•
W
h
e
n
o
u
t
p
u
t
t
h
e
s
a
m
e
d
a
t
a
t
o
m
u
l
t
i
p
l
e
p
l
o
t
t
e
r
s
a
t
t
h
e
s
a
m
e
t
i
m
e
,
e
n
o
u
g
h
o
u
t
p
u
t
p
e
r
f
o
r
m
a
n
c
e
m
a
y
n
o
t
b
e
o
b
t
a
i
n
e
d
.
F
o
l
l
o
w
t
h
e
s
p
e
c
i
f
i
c
a
t
i
o
n
o
f
t
h
e
a
p
p
l
i
c
a
t
i
o
n
.
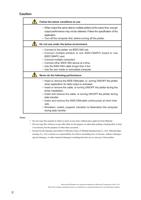
•
T
urn of
f the computer first, before turning of
f the plotter
.
Do
not
use
under
the
below
environment
•
Connect
to
the
plotter
via
IEEE1394
hub.
•
C
o
n
n
e
c
t
m
u
l
t
i
p
l
e
p
l
o
t
t
e
r
s
t
o
o
n
e
I
E
E
E
1
3
9
4
P
C
I
b
o
a
r
d
o
r
o
n
e
I
E
E
E
1
3
9
4
P
C
c
a
r
d
.
•
C
o
n
n
e
c
t
m
u
l
t
i
p
l
e
c
o
m
p
u
t
e
r
s
•
Connect other IEEE1394 device at a time.
•
Use
the
IEEE1394
cable
longer
than
4.5m.
•
Use
the
own
made
or
remodeled
computer
.
N
e
v
e
r
d
o
t
h
e
f
o
l
l
o
w
i
n
g
p
e
r
f
o
r
m
a
n
c
e
•
I
n
s
e
r
t
o
r
r
e
m
o
v
e
t
h
e
I
E
E
E
1
3
9
4
c
a
b
l
e
,
o
r
t
u
r
n
i
n
g
O
N
/
O
F
F
t
h
e
p
l
o
t
t
e
r
when
application
for
data
output
is
activated.
•
I
n
s
e
r
t
o
r
r
e
m
o
v
e
t
h
e
c
a
b
l
e
,
o
r
t
u
r
n
i
n
g
O
N
/
O
F
F
t
h
e
p
l
o
t
t
e
r
d
u
r
i
n
g
t
h
e
d
r
i
v
e
r
i
n
s
t
a
l
l
a
t
i
o
n
.
•
I
n
s
e
r
t
a
n
d
r
e
m
o
v
e
t
h
e
c
a
b
l
e
,
o
r
t
u
r
n
i
n
g
O
N
/
O
F
F
t
h
e
p
l
o
t
t
e
r
d
u
r
i
n
g
d
a
t
a
t
r
a
n
s
f
e
r
.
•
I
n
s
e
r
t
a
n
d
r
e
m
o
v
e
t
h
e
I
E
E
E
1
3
9
4
c
a
b
l
e
c
o
n
t
i
n
u
o
u
s
l
y
a
t
s
h
o
r
t
i
n
t
e
r
-
v
a
l
s
.
•
S
h
u
t
d
o
w
n
,
r
e
s
t
a
r
t
,
s
u
s
p
e
n
d
,
t
r
a
n
s
i
t
i
o
n
t
o
h
i
b
e
r
n
a
t
i
o
n
t
h
e
c
o
m
p
u
t
e
r
during data transfer
.
N
o
t
e
s
•
Do
not
cop
y
this
manual
in
whole
or
parts
in
an
y
form
without
prior
appro
v
al
from
Mimaki.
•
D
o
n
o
t
c
o
p
y
t
h
i
s
s
o
f
t
w
a
r
e
t
o
a
n
y
o
t
h
e
r
d
i
s
k
f
o
r
t
h
e
p
u
r
p
o
s
e
o
f
o
t
h
e
r
t
h
a
n
m
a
k
i
n
g
a
b
a
c
k
u
p
d
i
s
k
o
r
l
o
a
d
it in memory for the purpose of other than e
x
ecution.
•
E
x
c
e
p
t
f
o
r
t
h
e
d
a
m
a
g
e
s
p
r
e
s
c
r
i
b
e
d
i
n
W
a
r
r
a
n
t
y
N
o
t
e
s
o
f
M
i
m
a
k
i
E
n
g
i
n
e
e
r
i
n
g
C
o
.
,
L
t
d
.
,
M
i
m
a
k
i
E
n
g
i
-
n
e
e
r
i
n
g
C
o
.
,
L
t
d
.
a
s
s
u
m
e
s
n
o
r
e
s
p
o
n
s
i
b
i
l
i
t
y
f
o
r
e
f
f
e
c
t
s
(
i
n
c
l
u
d
i
n
g
l
o
s
s
o
f
i
n
c
o
m
e
,
i
n
d
i
r
e
c
t
d
a
m
a
g
e
s
,
special damages, or other f
inancial damages) resulting from the use or non-use of the product.
Microsoft
and
W
indo
ws
are
re
gistered
trademarks
of
Microsoft
Corporation
of
the
U.S.A.
Each of the compan
y and product names is a trademark or a registered trademark of each indi
vidual compan
y
.
3
Installation
Procedure
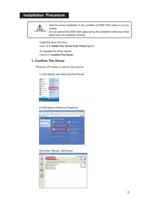
•
S
t
a
r
t
t
h
e
d
r
i
v
e
r
i
n
s
t
a
l
l
a
t
i
o
n
i
n
t
h
e
c
o
n
d
i
t
i
o
n
o
f
I
E
E
E
1
3
9
4
c
a
b
l
e
i
s
n
o
t
c
o
n
-
n
e
c
t
e
d
.
•
D
o
n
o
t
c
o
n
n
e
c
t
t
h
e
I
E
E
E
1
3
9
4
c
a
b
l
e
d
u
r
i
n
g
t
h
e
i
n
s
t
a
l
l
a
t
i
o
n
o
t
h
e
r
w
i
s
e
i
n
s
t
a
l
-
lation
may
not
complete
normally
.
:
I
n
s
t
a
l
l
t
h
e
d
r
i
v
e
r
f
i
r
s
t
t
i
m
e
⇒
Go to
3. Install The Driver First T
ime
(Page 6)
:T
o
upgrade
the
driver
version
⇒
Go
to
1.
Confirm
The
Driver
1
.
C
o
n
f
i
r
m
T
h
e
D
r
i
v
e
r
*
W
i
n
d
o
w
s
X
P
s
c
r
e
e
n
i
s
u
s
e
d
o
n
t
h
i
s
m
a
n
u
a
l
1)
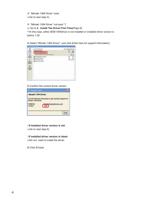
Click
[Start],
and
select
[Control
Panel]
2) Click [Add or Remove Programs]
3)Find
the
“Mimaki
1394
Driver”
4
:
I
f
“
M
i
m
a
k
i
1
3
9
4
D
r
i
v
e
r
”
e
x
i
s
t
⇒
G
o
t
o
n
e
x
t
s
t
e
p
4
)
:If “Mimaki 1394 Driver” not exist
*1
⇒
Go to
3. Install The Driver First T
ime
(Page 6)
*1In this case, either IEEE1394driver is not installed or installed driver version is
b
e
f
o
r
e
1
.
5
0
4) Select “Mimaki 1394 Driver”, and click [Click here for support information]
5) Confirm the current driver version
:
If
installed
driver
version
is
old
⇒
G
o
t
o
n
e
x
t
s
t
e
p
6
)
: If installed driver version is latest
⇒
D
o
n
o
t
n
e
e
d
t
o
i
n
s
t
a
l
l
t
h
e
d
r
i
v
e
r
.
6
)
C
l
i
c
k
[
C
l
o
s
e
]
5
2.
Uninstall
The
Existing
Driver
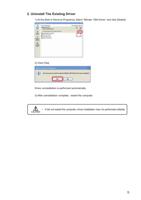
1)
At
the
[Add
or
Remove
Programs],
Select
“Mimaki
1394
Driver”
and
click
[Delete]
2
)
C
l
i
c
k
[
Y
e
s
]
Driver
uninstallation
is
performed
automatically
.
3)
After uninstallation complete, restart the computer
.
•
I
f
d
i
d
n
o
t
r
e
s
t
a
r
t
t
h
e
c
o
m
p
u
t
e
r
,
d
r
i
v
e
r
i
n
s
t
a
l
l
a
t
i
o
n
m
a
y
n
o
t
p
e
r
f
o
r
m
e
d
c
o
l
l
e
c
t
l
y
6
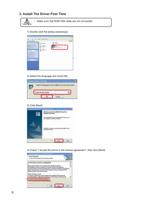
3.
Install
The
Driver
First
T
ime
•
Make
sure
that
IEEE1394
cable
are
not
connected
1
)
D
o
u
b
l
e
c
l
i
c
k
t
h
e
[
s
e
t
u
p
.
e
x
e
(
s
e
t
u
p
)
]
-
2)
Select
the
language
and
click[
OK]
3)
Click
[Next]
4)
Check
“I
accept
the
terms
in
the
license
agreement”,
then
click
[Next]
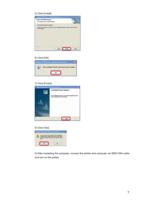
7
5
)
C
l
i
c
k
[
I
n
s
t
a
l
l
]
6)
Click
[OK]
7
)
C
l
i
c
k
[
F
i
n
i
s
h
]
8
)
C
l
i
c
k
[
Y
e
s
]
9
)
A
f
t
e
r
r
e
s
t
a
r
t
i
n
g
t
h
e
c
o
m
p
u
t
e
r
,
c
o
n
n
e
c
t
t
h
e
p
l
o
t
t
e
r
a
n
d
c
o
m
p
u
t
e
r
v
i
a
I
E
E
E
1
3
9
4
c
a
b
l
e
and
turn
on
the
plotter
8
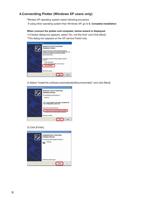
4.Connectting Plotter (W
indows XP
users only)
*
W
i
n
d
w
s
X
P
o
p
e
r
a
t
i
n
g
s
y
s
t
e
m
n
e
e
d
s
f
o
l
l
o
w
i
n
g
p
r
o
c
e
d
u
r
e
.
If
using
other
operating
system
than
WIndows
XP
,
go
to
5.
Complete
installation
When connect the plotter and computer
, below wisard is displayed.
1)
If
below
dialog
box
appears,
select
“No,
not
this
time”
and
Click
[Next]
*This dialog box appears on the XP
service Pack2 only
.
2)
Select
“Install
the
software
automatically(Recommended)”
and
click
[Next]
3
)
C
l
i
c
k
[
F
i
n
i
s
h
]
9
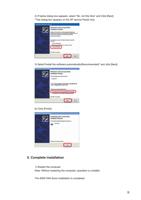
4)
If
below
dialog
box
appears,
select
“No,
not
this
time”
and
Click
[Next]
*This dialog box appears on the XP
service Pack2 only
.
5)
Select“Install
the
software
automatically(Recommended)”
and
click
[Next]
6
)
C
l
i
c
k
[
F
i
n
i
s
h
]
5.
Complete
installation
1)
Restart
the
computer
Note:
Without
restarting
the
computer
,
operation
is
unstable
The IEEE1394 driver installation is completed.
1
0
D
2
0
1
0
9
3
-
1
.
4
0
-
2
0
0
1
2
0
0
6
©
M
I
M
A
K
I
E
N
G
I
N
E
E
R
I
N
G
C
O
.
,
L
T
D
.
N
H
"
Do you need help?
Call Me Back