Str uct ure ofO per ati onP ane l 1 T ouc hSc ree Page (Page 1 / 1) Dahao A15 Controller Operation Quick Guide

Str uct ure ofO per ati onP ane l 1 T ouc hSc ree Page (Page 1 / 11) Dahao A15 Controller Operation Quick Guide

Str uct ure ofO per ati onP ane l 1 T ouc hSc ree (Page 1 / 11) Dahao A15 Controller Operation Quick Guide


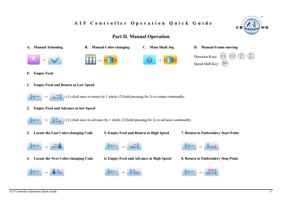
Structure of Operation Panel 1. Touch Screen LCD screen of high brightness is used as the touch screen of man-machine interface. 2. Operation Button It is used to start or stop embroidery. 3. USB Main Interface 2 USB disks can be connected for data input and output. A15 Controller Operation Quick Guide 1

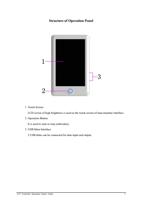
Main Interface Instructions Main Interface Pattern Management Embroidery Parameters Color-changing Sequence No. Icon Name No. Icon Name 1 Network Disconnection 2 "Pattern Management" Interface Cyclic Embroidery Hint "Parameter Setting" Interface Thread Breakage Hint "Color-changing Sequence Setting" Interface 3 Pattern Display Area Main Interface 2 A15 Controller Operation Quick Guide
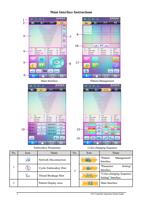
No. Icon Name No. Icon Name 4 Basic Pattern Information 11 Memory Pattern Preview Clear X/Y Displacement Letter Pattern Operation 5 Manual Thread Trimming Delete Pattern Main Shaft Jog Pattern Output Frame Selection and Position Return to Main Interface Auto Color-changing and Auto Start U Disk Management Manual Color-changing and Manual Start Other Functions Back Single/Multiple Selection , Main Shaft Speed Up/Down Next Empty Feed 12 Common Parameter Setting 6 Embroidery Ready Status, which can be confirmed Pattern Preview Embroidery Confirmation Status, which can be released 13 Current Operation Other Function Operation Color Number List Manual Color-changing Needle Bar Number and Color 7 Current Needle Position Move Up Current Color-changing Time Insert Needle Bar No. Color-changing Sequence Delete Needle Bar No. Scale up pattern, and holding pressing for 2s to change into (scale down pattern) Move Down 8 Manual Frame-moving Needle Bar Number Color Selection Area 9 Memory Pattern List 14 Repeat 10 Page Up/Page Down Appliqué Needle Bar Color A15 Controller Operation Quick Guide 3
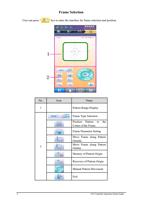
Frame Selection User can press "" key to enter the interface for frame selection and position. No. Icon Name 1 Pattern Range Display 2 Frame Type Selection Position Pattern to the Center of the Frame Frame Parameter Setting Move Frame along Pattern Outside Move Frame along Pattern Outline Memory of Pattern Origin Recovery of Pattern Origin Manual Pattern Movement Exit 4 A15 Controller Operation Quick Guide

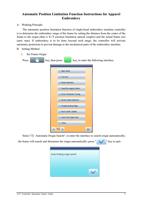
Automatic Position Limitation Function Instructions for Apparel Embroidery A. Working Principle The automatic position limitation function of single-head embroidery machine controller is to determine the embroidery range of the frame by setting the distance from the center of the frame to the origin (that is X-/Y position limitation optical coupler) and the actual frame size (unit: mm). If embroidery is to be done beyond such range, the controller will activate automatic protection to prevent damage to the mechanical parts of the embroidery machine. B. Setting Method 1. Set Frame Origin Press key, then press key, to enter the following interface. Select " Automatic Origin Search", to enter the interface to search origin automatically; the frame will search and determine the origin automatically; press "" key to quit. A15 Controller Operation Quick Guide 5

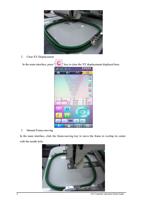
2. Clear XY Displacement In the main interface, press "" key to clear the XY displacement displayed here. 3. Manual Frame-moving In the main interface, click the frame-moving key to move the frame to overlap its center with the needle hole. 6 A15 Controller Operation Quick Guide
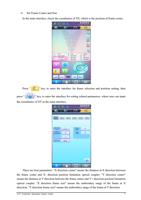
4. Set Frame Center and Size In the main interface, check the coordinates of XY, which is the position of frame center. Press "" key, to enter the interface for frame selection and position setting; then press "" key, to enter the interface for setting related parameters, where user can input the coordinates of XY in the main interface. There are four parameters: "X direction center" means the distance at X direction between the frame center and X- direction position limitation optical coupler; "Y direction center" means the distance at Y direction between the frame center and Y+ direction position limitation optical coupler. "X direction frame size" means the embroidery range of the frame at X direction; "Y direction frame size" means the embroidery range of the frame at Y direction. A15 Controller Operation Quick Guide 7
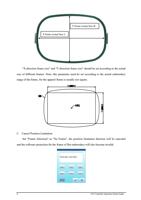
"X direction frame size" and "Y direction frame size" should be set according to the actual size of different frames. Note: this parameter need be set according to the actual embroidery range of the frame, for the apparel frame is usually not square. C. Cancel Position Limitation Set "Frame Selection" as "No Frame", the position limitation function will be canceled and the software protection for the frame of flat embroidery will also become invalid. X Frame Actual Size L Y Frame Actual Size W 8 A15 Controller Operation Quick Guide
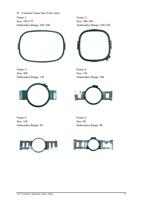
D. Common Frame Size (Unit: mm) Frame 1: Frame 2: Size: 550×375 Size: 290×290 Embroidery Range: 430×260 Embroidery Range: 23230 Frame 3: Frame 4: Size: 200 Size: 150 Embroidery Range: 150 Embroidery Range: 100 Frame 5: Frame 6: Size: 120 Size: 90 Embroidery Range: 90 Embroidery Range: 40 A15 Controller Operation Quick Guide 9
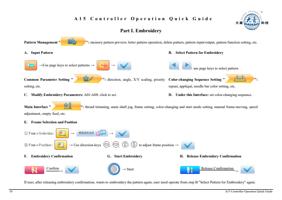
A15 Controller Operation Quick Guide Part I. Embroidery Pattern Management "": memory pattern preview, letter pattern operation, delete pattern, pattern input/output, pattern function setting, etc. A. Input Pattern B. Select Pattern for Embroidery Use page keys to select patterns , : use page keys to select pattern Common Parameter Setting "": direction, angle, X/Y scaling, priority setting, etc. Color-changing Sequence Setting "": repeat, appliqué, needle bar color setting, etc. C. Modify Embroidery Parameters: A01-A08: click to set. D. Under this Interface: set color-changing sequence. Main Interface "": thread trimming, main shaft jog, frame setting, color-changing and start mode setting, manual frame-moving, speed adjustment, empty feed, etc. E. Frame Selection and Position Frame Selection: Frame Position: Use direction keys , , , to adjust frame position F. Embroidery Confirmation G. Start Embroidery H. Release Embroidery Confirmation Confirm Start Release Confirmation If user, after releasing embroidery confirmation, wants to embroidery the pattern again, user need operate from step B "Select Pattern for Embroidery" again. 10 A15 Controller Operation Quick Guide
    "

Do you need help?

Call Me Back
    "

Do you need help?

Call Me Back
    "

Do you need help?

Call Me Back
    "

Do you need help?

Call Me Back